


作者:Dan
英文版:「Deploy a PST contract using Warp」

在本教程中,我们将学习如何通过 Warp 建立一个简单的 PST 应用程序。为了实现这个目标,我们将编写一个 PST 合约,在用户本地测试网做一些测试后并把它部署到 Redstone 公共测试网。它将让我们铸造一些代币,以及在地址之间转移它们,并读取当前的余额。然后,我们将创建一个简单的 dApp,它将帮助我们以用户友好的方式与合约交互。
准备工作:
安装好 node.js 16.5 或者以上版本
安装好 yarn
安装好 visual studio code
安装好 python 3
安装好 git
一、下载代码并启动 visual studio code
1、clone 代码到本地机器,使用如下命令:
git clone https://github.com/warp-contracts/academy.git
2、切换到工作目录,使用命令:
cd academy/warp-academy-pst/challenge

3、用 visual studio code 打开源代码,使用命令 code . 启动 visual studio code

4、安装依赖,使用命令:
yarn add arweave@1.11.4 arlocal@1.1.42 warp-contracts@1.0.1

二、编辑代码
1、定义状态类型
打开文件 warp-academy-pst/challenge/src/contracts/types/types.ts,复制以下代码:
export interface PstState {

ticker: string;

name: string;

owner: string;

balances: {

[address: string]: number,

};

}
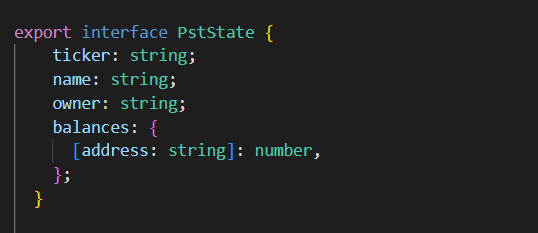
PstState 代表合约的当前状态。是由开发者来决定,在我们的实现中,它将由四个属性组成:
ticker—— token 名字的缩写name—— token 的名字owner—— token 拥有者balances—— 定义地址的代币余额
2、设置初始状态
打开文件,warp-academy-pst/challenge/src/contracts/initial-state.json
复制以下代码:
{

"ticker": "FC",

"name": "Federation Credits",

"owner": "GH2IY_3vtE2c0KfQve9_BHoIPjZCS8s5YmSFS_fppKI",

"balances": {

"GH2IY_3vtE2c0KfQve9_BHoIPjZCS8s5YmSFS_fppKI": 1000,

"33F0QHcb22W7LwWR1iRC8Az1ntZG09XQ03YWuw2ABqA": 230

  }

}
3、编辑合约源代码
合约包括了一个 handle 函数,接受两个参数
第一个参数是 state,代表合约的当前状态,第二个参数是 action,包括两个属性,caller 代表合约的调用者,input 代表用户的输入
handle 函数必须通过下面三种方式结束:
返回
{ state: newState }—— 当合约状态在特定的交互后发生变化时。返回
{ result: someResult }—— 当合约状态在交互后没有改变时。抛出
ContractError异常
类型定义:
打开文件 warp-academy-pst/challenge/src/contracts/types/types.ts,添加以下类型:
export interface PstAction {

  input: PstInput;

  caller: string;

}

export interface PstInput {

  function: PstFunction;

  target: string;

  qty: number;

}

export interface PstResult {

  target: string;

  ticker: string;

  balance: number;

}

export type PstFunction = 'transfer' | 'mint' | 'balance';

export type ContractResult = { state: PstState } | { result: PstResult };
PstAction 代表合约的交互。如前所述,它有两个属性 —— 调用者和输入。输入由三个属性构成:
function—— 交互类型 (在我们的例子中可以是转移代币,mint 代币,读取余额)target—— 目标地址qty—— 代币数量
PstResult 当合约状态在交互后没有改变时返回的对象,包含三个属性:
target——目标地址.ticker—— token名字的缩写.balance—— 余额
余额函数:
打开文件 warp-academy-pst/challenge/src/contracts/actions/read/balance.ts,添加以下代码:
declare const ContractError;

export const balance = async (

  state: PstState,

  { input: { target } }: PstAction

): Promise<ContractResult> => {

  const ticker = state.ticker;

  const balances = state.balances;

  if (typeof target !== 'string') {

    throw new ContractError('Must specify target to get balance for');

  }

  if (typeof balances[target] !== 'number') {

    throw new ContractError('Cannot get balance, target does not exist');

  }

  return { result: { target, ticker, balance: balances[target] } };

};
上述函数将帮助我们读取指定目标地址的余额。
铸造代币函数:
打开文件 warp-academy-pst/challenge/src/contracts/actions/write/mintTokens.ts,添加以下代码:
declare const ContractError;

export const mintTokens = async (

  state: PstState,

  { caller, input: { qty } }: PstAction

): Promise<ContractResult> => {

  const balances = state.balances;

  if (qty <= 0) {

    throw new ContractError('Invalid token mint');

  }

  if (!Number.isInteger(qty)) {

    throw new ContractError('Invalid value for "qty". Must be an integer');

  }

  balances[caller] ? (balances[caller] += qty) : (balances[caller] = qty);

  return { state };

};
这个函数将会 mint 代币到调用者地址。
转移代币函数:
打开文件 warp-academy-pst/challenge/src/contracts/actions/write/transferTokens.ts,添加以下代码:
declare const ContractError;

export const transferTokens = async (

  state: PstState,

  { caller, input: { target, qty } }: PstAction

): Promise<ContractResult> => {

  const balances = state.balances;

  if (!Number.isInteger(qty)) {

    throw new ContractError('Invalid value for "qty". Must be an integer');

  }

  if (!target) {

    throw new ContractError('No target specified');

  }

  if (qty <= 0 || caller === target) {

    throw new ContractError('Invalid token transfer');

  }

  if (!balances[caller]) {

    throw new ContractError(`Caller balance is not defined!`);

  }

  if (balances[caller] < qty) {

    throw new ContractError(

      `Caller balance not high enough to send ${qty} token(s)!`

    );

  }

  balances[caller] -= qty;

  if (target in balances) {

    balances[target] += qty;

  } else {

    balances[target] = qty;

  }

  return { state };

};
处理函数:
打开文件 warp-academy-pst/challenge/src/contracts/contract.ts,添加以下代码:
import { balance } from './actions/read/balance';

import { mintTokens } from './actions/write/mintTokens';

import { transferTokens } from './actions/write/transferTokens';

import { PstAction, PstResult, PstState } from './types/types';

declare const ContractError;

export async function handle(

  state: PstState,

  action: PstAction

): Promise<ContractResult> {

  const input = action.input;

  switch (input.function) {

    case 'mint':

      return await mintTokens(state, action);

    case 'transfer':

      return await transferTokens(state, action);

    case 'balance':

      return await balance(state, action);

    default:

      throw new ContractError(

        `No function supplied or function not recognised: "${input.function}"`

      );

  }

}
Handle 函数是合约的核心,接受两个参数分别是 state 和 action,对 action 进行判断去调用对应的函数。
三、用 ESBuild 将 ts 文件转化为 js 文件
运行命令 yarn build:contracts:

四、编写测试文件
进入文件 warp-academy-pst/challenge/tests/contract.test.ts,复制以下代码:
import fs from 'fs';

import ArLocal from 'arlocal';

import Arweave from 'arweave';

import { JWKInterface } from 'arweave/node/lib/wallet';

import path from 'path';

import { addFunds, mineBlock } from '../utils/_helpers';

import {

  PstContract,

  PstState,

  Warp,

  WarpNodeFactory,

  LoggerFactory,

  InteractionResult,

} from 'warp-contracts';

describe('Testing the Profit Sharing Token', () => {

  let contractSrc: string;

  let wallet: JWKInterface;

  let walletAddress: string;

  let initialState: PstState;

  let arweave: Arweave;

  let arlocal: ArLocal;

  let warp: Warp;

  let pst: PstContract;

  beforeAll(async () => {

  // ~~ Declare all variables ~~

  // ~~ Set up ArLocal and instantiate Arweave ~~

  arlocal = new ArLocal(1820);

  await arlocal.start();

  arweave = Arweave.init({

  host: 'localhost',

  port: 1820,

  protocol: 'http',

  });

  // ~~ Initialize 'LoggerFactory' ~~

  LoggerFactory.INST.logLevel('error');

  // ~~ Set up Warp ~~

  warp = WarpNodeFactory.forTesting(arweave);

  // ~~ Generate wallet and add funds ~~

  wallet = await arweave.wallets.generate();

  walletAddress = await arweave.wallets.jwkToAddress(wallet);

  await addFunds(arweave, wallet);

  // ~~ Read contract source and initial state files ~~

  contractSrc = fs.readFileSync(path.join(__dirname, '../dist/contract.js'), 'utf8');

  const stateFromFile: PstState = JSON.parse(

  fs.readFileSync(path.join(__dirname, '../dist/contracts/initial-state.json'), 'utf8')

  );

  // ~~ Update initial state ~~

  initialState = {

  ...stateFromFile,

  ...{

  owner: walletAddress,

  },

  };

  // ~~ Deploy contract ~~

  const contractTxId = await warp.createContract.deploy({

  wallet,

  initState: JSON.stringify(initialState),

  src: contractSrc,

  });

  // ~~ Connect to the pst contract ~~

  pst = warp.pst(contractTxId);

  pst.connect(wallet);

  // ~~ Mine block ~~

  await mineBlock(arweave);

  });

  afterAll(async () => {

  // ~~ Stop ArLocal ~~

  await arlocal.stop();

  });

  it('should read pst state and balance data', async () => {

  expect(await pst.currentState()).toEqual(initialState);

  expect(

  (await pst.currentBalance('GH2IY_3vtE2c0KfQve9_BHoIPjZCS8s5YmSFS_fppKI'))

  .balance

  ).toEqual(1000);

  expect(

  (await pst.currentBalance('33F0QHcb22W7LwWR1iRC8Az1ntZG09XQ03YWuw2ABqA'))

  .balance

  ).toEqual(230);

  });

  it('should properly mint tokens', async () => {

  await pst.writeInteraction({

  function: 'mint',

  qty: 2000,

  });

  await mineBlock(arweave);

  expect((await pst.currentState()).balances[walletAddress]).toEqual(2000);

  });

  it('should properly add tokens for already existing balance', async () => {

  });

  it('should properly transfer tokens', async () => {

  await pst.transfer({

  target: 'GH2IY_3vtE2c0KfQve9_BHoIPjZCS8s5YmSFS_fppKI',

  qty: 555,

  });

  await mineBlock(arweave);

  expect((await pst.currentState()).balances[walletAddress]).toEqual(

  2000 - 555

  );

  expect(

  (await pst.currentState()).balances[

  'GH2IY_3vtE2c0KfQve9_BHoIPjZCS8s5YmSFS_fppKI'

  ]

  ).toEqual(1000 + 555);

  });

  it('should properly view contract state', async () => {});

  it('should properly perform dry write with overwritten caller', async () => {

  const newWallet = await arweave.wallets.generate();

  const overwrittenCaller = await arweave.wallets.jwkToAddress(newWallet);

  await pst.transfer({

  target: overwrittenCaller,

  qty: 1000,

  });

  await mineBlock(arweave);

  const result: InteractionResult<PstState, unknown> = await pst.dryWrite(

  {

  function: 'transfer',

  target: 'GH2IY_3vtE2c0KfQve9_BHoIPjZCS8s5YmSFS_fppKI',

  qty: 333,

  },

  overwrittenCaller

  );

  expect(result.state.balances[walletAddress]).toEqual(

  2000 - 555 - 1000

  );

  expect(

  result.state.balances['GH2IY_3vtE2c0KfQve9_BHoIPjZCS8s5YmSFS_fppKI']

  ).toEqual(1000 + 555 + 333);

  expect(result.state.balances[overwrittenCaller]).toEqual(1000 - 333);

  });

});
以上代码会在本地启动一个 AR 的测试网,创建一个 AR 钱包,并将合约部署在本地的测试网上,并测试了铸造代币和转移代币等功能。
进入 warp-academy-pst\challenge\utils\_helpers.ts,复制以下代码:
import Arweave from 'arweave';

import { JWKInterface } from 'arweave/node/lib/wallet';

// ~~ Write function responsible for adding funds to the generated wallet ~~

export async function addFunds(arweave: Arweave, wallet: JWKInterface) {

  const walletAddress = await arweave.wallets.getAddress(wallet);

  await arweave.api.get(`/mint/${walletAddress}/1000000000000000`);

  }

// ~~ Write function responsible for mining block on the Arweave testnet ~~

export async function mineBlock(arweave: Arweave) {

  await arweave.api.get('mine');

  }
五、在本地命令行部署合约并运行测试
在命令行输入命令 yarn test:node,


上图就是六个测试用例在本地测试网成功测试的结果。
六、编辑用于部署合约到 redstone 测试网的源文件
进入文件 warp-academy-pst\challenge\src\tools\deploy-test-contract.ts,复制以下代码:
import Arweave from 'arweave';

import { JWKInterface } from 'arweave/node/lib/wallet';

import { PstState } from '../contracts/types/types';

import { LoggerFactory, PstContract, Warp, WarpNodeFactory } from 'warp-contracts';

import fs from 'fs';

import path from 'path';

import { addFunds, mineBlock } from '../../utils/_helpers';

let contractSrc: string;

let wallet: JWKInterface;

let walletAddress: string;

let initialState: PstState;

let arweave: Arweave;

let warp: Warp;

(async () => {

// ~~ Declare variables ~~

// ~~ Initialize Arweave ~~

arweave = Arweave.init({

  host: 'testnet.redstone.tools',

  port: 443,

  protocol: 'https',

  });

// ~~ Initialize `LoggerFactory` ~~

LoggerFactory.INST.logLevel('error');

// ~~ Initialize Warp ~~

warp = WarpNodeFactory.memCached(arweave);

// ~~ Generate wallet and add some funds ~~

wallet = await arweave.wallets.generate();

walletAddress = await arweave.wallets.jwkToAddress(wallet);

await addFunds(arweave, wallet);

// ~~ Read contract source and initial state files ~~

contractSrc = fs.readFileSync(

  path.join(__dirname, '../../dist/contract.js'),

  'utf8'

  );

  const stateFromFile: PstState = JSON.parse(

  fs.readFileSync(

  path.join(__dirname, '../../dist/contracts/initial-state.json'),

  'utf8'

  )

  );

// ~~ Override contract's owner address with the generated wallet address ~~

initialState = {

  ...stateFromFile,

  ...{

  owner: walletAddress,

  },

  };

// ~~ Deploy contract ~~

const contractTxId = await warp.createContract.deploy({

  wallet,

  initState: JSON.stringify(initialState),

  src: contractSrc,

  });

// ~~ Log contract id to the console ~~

console.log(contractTxId);

//Mine block

await mineBlock(arweave);

})();
这段代码主要是创建一个连接 redstone 测试网的实例,创建一个钱包,领取 AR 测试代币,部署合约到 redstone 测试网,部署成功以后会输出部署的合约地址。
七、部署合约到 redstone 测试网
在命令行输入命令 yarn ts-node src/tools/deploy-test-contract.ts

上图说明合约已经成功部署到 redstone 测试网,合约地址为:XeJiSHIkj0dVU7ddGtOIE8kZoQEIPcqvLS_y5KPu62w
八、编辑前端文件的源代码
前端是使用 vue V2 开发的,以下是前端源代码的目录机构:
challenge/src/main.ts —— 是一个应用程序的入口。
challenge/src/pst-contract.ts —— 在这里我们定义 Arweave 和 SmartWeave 的实例并将其导出。
challenge/src/deployed-contracts.ts —— 在这里我们表明部署在 redstone 测试网上的合约ID。
challenge/src/constants.ts —— 所有的常量(包括 URL)。
challenge/src/assets —— 应用程序中使用的所有资产。
challenge/src/components —— 所有的组件,这些组件是 Vue 封装可重用代码的关键功能。
challenge/src/router —— 使用 vue-router 构建的应用程序的路由器。
challenge/src/store —— 使用 Vuex 构建应用程序的存储,Vuex 是一种状态管理模式和库。它可以作为应用程序中所有组件的集中存储。
challenge/src/views —— 应用程序的视图层。
进入 challenge/src/pst-contract.ts,复制以下代码:
import Arweave from 'arweave';

import {

  PstContract,

  PstState,

  Warp,

  WarpNodeFactory,

  LoggerFactory,

  InteractionResult,

  WarpWebFactory

  } from 'warp-contracts';

export const arweave: Arweave = Arweave.init({

  host: 'testnet.redstone.tools',

  port: 443,

  protocol: 'https',

  });

  export const warp: Warp = WarpWebFactory.memCachedBased(arweave).useArweaveGateway().build();
进入文件 challenge\src\deployed-contracts.ts,添加之前成功部署的合约ID:

这里的合约地址应该填入自己成功部署在 redstone 测试网的合约地址
进入文件 challenge\src\constants.ts,复制以下代码:
export const url = {

  warpGateway: '[https://gateway.redstone.finance](https://gateway.redstone.finance)',

};
进入文件 challenge\src\store\index.ts,复制以下代码:
import Vue from 'vue';
import Vuex from 'vuex';
import { arweave, warp } from '../pst-contract';
import { deployedContracts } from '../deployed-contracts';
import { PstState } from '@/contracts/types/types';
import { Contract } from 'warp-contracts';
Vue.use(Vuex);
export default new Vuex.Store({
state: {
arweave,
warp,
state: {},
validity: {},
contract: null,
walletAddress: null,
},
mutations: {
setState(state, swState) {
state.state = swState;
},
setValidity(state, validity) {
state.validity = validity;
},
setContract(state, contract) {
state.contract = contract;
},
setWalletAddress(state, walletAddress) {
state.walletAddress = walletAddress;
},
},
actions: {
async loadState({ commit }) {
// ~~ Generate arweave wallet ~~
const wallet = await arweave.wallets.generate();
// ~~ Get wallet address and mint some tokens ~~
const walletAddress = await arweave.wallets.getAddress(wallet);
await arweave.api.get(`/mint/${walletAddress}/1000000000000000`);
// ~~ Connect deployed contract and wallet ~~
const contract: Contract = warp
.pst(deployedContracts.fc)
.connect(wallet);
commit('setContract', contract);
// ~~ Set the state of the contract ~~
const { state, validity } = await contract.readState();
commit('setState', state);
commit('setValidity', validity);
commit('setWalletAddress', walletAddress);
},
},
modules: {},
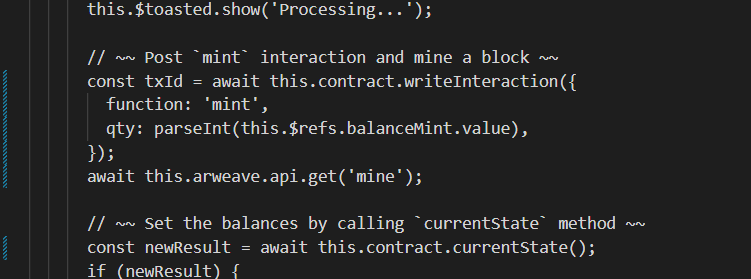
});进入文件 challenge\src\components\Header\Header.vue,插入以下代码:
const txId = await this.contract.writeInteraction({

  function: 'mint',

  qty: parseInt(this.$refs.balanceMint.value),

  });

  await this.arweave.api.get('mine');

  // ~~ Set the balances by calling `currentState` method ~~

  const newResult = await this.contract.currentState();
具体插入代码的位置,请参考下图:
进入文件 challenge\src\components\BalancesList\BalancesList.vue,插入以下代码:
const tx = await this.contract.transfer({

  target: address,

  qty: parseInt(qty),

  });

  // ~~ Mine a block ~~

  await this.arweave.api.get('mine');

  // ~~ Set new balances list by calling `currentState` method

  let newResult = await this.contract.currentState();
具体插入的代码位置,请参考下图:

到现在为止,所有的源代码编辑工作完成。
九、通过前端与 redstone 测试网部署的合约进行交互
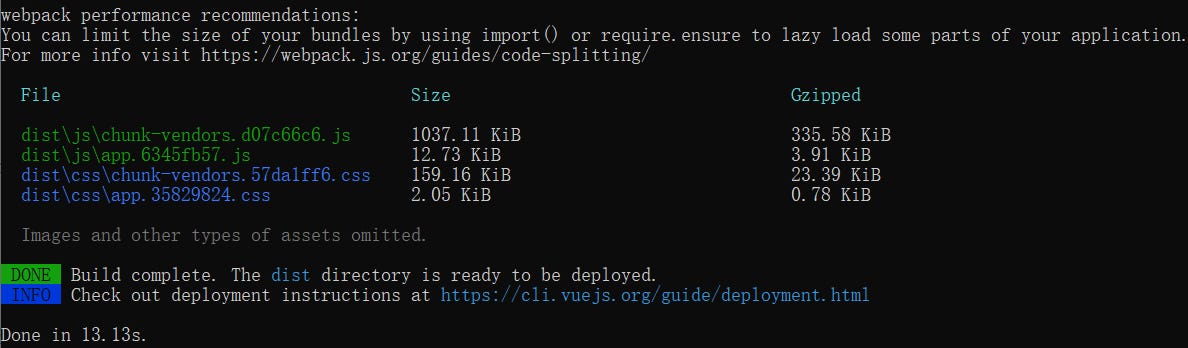
在命令行输入 yarn build 来 build 整个项目,

下图是 build 成功的截图:
在命令行输入 yarn serve 来在开发环境中运行,下图是成功运行的截图:

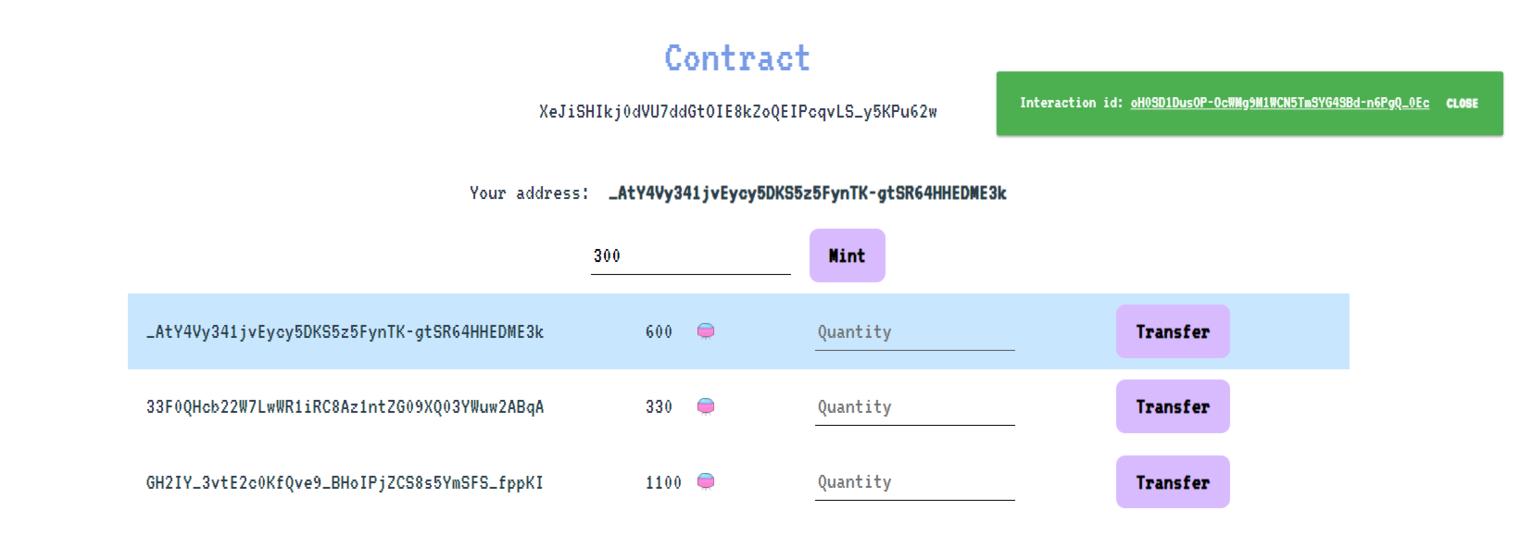
打开浏览器,在地址栏输入网址 http://localhost:8080/,
打开后界面将会显示合约地址,钱包地址,以及代币余额等信息,这时候可以先 mint 一部分代币,然后再进行转账。

进行 mint 代币以及转账后代币的余额会发生变化。
声明:本文内容仅供参考、交流,不构成任何投资建议。若存在明显的理解或数据的错误,欢迎反馈。
本文内容系 W3.Hitchhiker 原创,如需转载请标明出处。
W3.Hitchhiker 官方推特:https://twitter.com/HitchhikerW3